Harmony User Guide
What's new in v1.5
Harmony Open
A new Autodesk plug-in is available as a separate installer. This enables "Harmony Open" which enables the opening of DWG files from inside AutoCAD and Civil 3D and automatically setting the correct standard and profile.
- Click here to find out more about the Autodesk plug-in installation
- Click here to learn how to use Harmony Open with Autodesk
Updated application integrations
In this release we have enabled integration with the following products:
- AutoCAD 2026
- Civil 3D 2026
- Microstation 2024
- OpenBridge Modeler 2024
- OpenBuildings Designer 2024
- OpenPlant Modeler 2024
- OpenRail Designer 2024
- OpenRoads Designer 2024
- OpenSite Designer 2024
Real-time metrics and reporting
Real-time metrics are now available which show usage and other useful data. Contact us to gain access to your Harmony dashboard.
AI based support
A new "?" icon is in the top right area of the window. This will dynamically take you to our Harmony Helper chatbot, hosted by OpenAI. Note, an OpenAI account is required to view this content. An account can be created for free and there is no charge to use Harmony Helper.
If your organization is unable to access OpenAI, Pencil 9 can redirect the "?" link to our User Guide, located on our website.
Status bar
A status bar is now present at the bottom of the Harmony desktop application. This shows helpful information as you navigate the ribbon and buttons.
Secure transmissions
All Harmony API calls are secured with end-to-end encryption to ensure robust data protection.
Improved Accessibility
In line with our commitment for continued improvement for Accessibility and compliance to the WCAG 2.1 guidelines, we have:
- Removed keyboard traps. This helps navigating Harmony via a keyboard.
- Integrated with Windows Narrator for Voice activated navigation.
Installation
Prerequisites
A machine with the following is required to install Harmony:
- Windows 10, 11 - Home or Professional
- 4GB RAM
- 50Mb free disk space
- ProjectWise Desktop Explorer 10.0.3.3XX or later (if using Harmony with Bentley ProjectWise)
Harmony was designed and tested on a 64-bit Operating System.
Harmony installation
Download Harmony from the Harmony download web page.
Launch the installer to start the install for Harmony.
The install is approximately 10Mb in size and will take a few minutes. If you have Bentley ProjectWise Explorer installed, a plug-in for it will automatically be installed. If ProjectWise is installed after Harmony is installed, just run the Harmony installer again to have the plug-in for ProjectWise installed. The installer should also be re-run after ProjectWise is upgraded, especially from 10.00.3.xx version to 2023+ versions.
New in 1.5 Autodesk plug-in installation
Download Autodesk plug-in from the Harmony download web page.
Launch the installer to start the install for the Autodesk plug-in.
After installation a Pencil 9 ribbon will be present on the Add-ins tab for Autodesk and Civil 3D applicatons. See Harmony Open with Autodesk for instructions on how to use this plug-in.
Creating installation packages
If your organization needs to generate an install package, ensure that Harmony is installed on a machine and the correct Organization code has been entered (see next section for instructions on entering an Organization code). Next navigate to C:\ProgramData\Pencil 9\Harmony and locate Organization.XML. Append this file as part of the install package to be placed in the same location. Harmony will read the Organization code and not require prompting by the application.
If your organization just needs to deploy Harmony as an External user of Harmony (i.e. does not have a subscription to Harmony), simply include the Harmony and Autodesk plug-in installation msi files as part of an Installation package and its ready for deployment.
Launching Harmony
Double click the Harmony icon that is on the desktop or from the Start menu (Start, Pencil 9, Harmony). On your first launch you are presented with a screen where there are three options:
- Enter an Organization Code
- Start Guest mode
- Start a 15 day trial
Details on each option is given below.
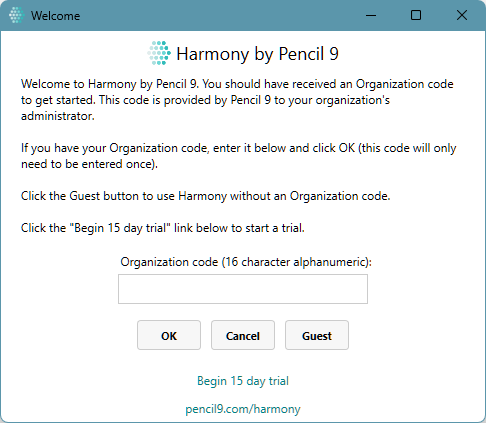
Organization code
As part of a subscription to Harmony, you will have been sent an Organization code. Ensure this is entered correctly when you launch Harmony for the first time. This ensures you and all other users are all part of the same Organization and can see your Organizations Standards.
Guest mode
Harmony can be used in "Guest" mode. This mode is only utilized by external parties who are collaborating with another Organization that has a Harmony sbscription. Using Guest mode disables synchronization with an Organization's standards and the ability to create standard definitions.
- See the Download screen for more information.
Start a Trial
Click "Begin 15 day trial" to activate the full version of Harmony for 15 days.
Quick Start
Let’s start by creating your first example package and automating its delivery!
The steps below guide you in creating your first package, creating an entry into the master standards catalogue and then using Harmony to automate its delivery.
- Create a new folder within your My Documents folder. Name the folder Harmony source files. Add some files to this folder.
- Create an empty folder called Harmony on your C Drive; C:\Harmony\
-
Launch Harmony and navigate to the Admin screen by clicking the third icon on the left hand side menu. Input your account credentials, which would have been sent to you.
Note: For users who are in trial mode, the following credentials can be used:
User name: harmonyadmin
Password: Harmony1234 - Click New Standard. This creates a new line in the master standards catalogue.
- Set the fields as follows:
| Infrastructure | Network |
| Source | Folder in step 1. eg C:\Users\XXXXX\Documents\Harmony source files |
| Display Name | Defaults to folder in step 1, can be changed if required. |
| Version | Optional: 1.0 |
| Status | WIP |
| Vendor | Optional: Any text is acceptable |
| Application | Optional: Any text is acceptable |
| Target | C:\Harmony\ |
| Description | Optional: My first Harmony package! |
- Click Commit to master to ensure the content is saved to the database.
- Test the functionality by selecting the row you just created and clicking the Test standard button.
Congratulations, you have just automated the delivery of your first item!
The content from Step 1 should now have synchronized to the location in Step 2.
Now, imagine instead of Step 1 being a practice location on your machine, this can be a file server location on your network, a cloud storage solution, Autodesk Construction Cloud® or Bentley ProjectWise. This is referred to as a “Master Location”.
Step 2 represents a “Target Location”.
Harmony is great at automating the delivery of content from a Master Location to a Target Location. In addition to automating the delivery of the content, Harmony will always keep the target content up to date, and can also automate the configuration of your design applications (such as Autodesk user profiles and Bentley workspaces)
To remove this example package from your local machine, just go to the Download screen, select the Harmony source files line and click the Remove standard button.
To remove this example package from the master standards catalogue, go to the Admin screen, highlight the Harmony source files line and select the Remove standard button.
Now that you have created an example package, learn more about the functionality of Harmony in the proceeding sections.
Navigation
There are four main areas that can be accessed from the main navigation bar on the left hand side of the Harmony application.
- The Available screen. This shows the Standards that are available for a user to use
- The Downloaded screen. This shows the standards that have been downloaded and enables a user to manage those standards on their computer.
- The Admin screen. This is for admins to configure and test the Standards prior to making them visible on the Available screen.
- The About screen. This has links to a user guide as well as other useful information such as release notes.
Available Screen
The Available screen shows the Standards that are available for the user to set.
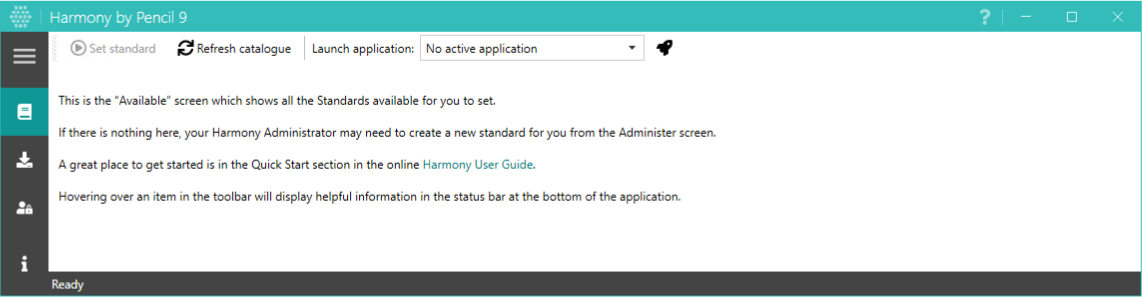
Set standard
To set a Standard, ensure that the standard to be set is highlighted and select the Set standard button. If you already have the standard, Set standard will make an already downloaded standard become the current standard and will also ensure the most up to date content is retrieved.
Harmony will retrieve the content and set the standard which could include automatically configuring the appropriate design application to use the content that has been retrieved.
Log-in credentials may be required to authorize the user if the standards are in a location where authentication is required.
Refresh catalogue
Selecting this button will refresh the available standards. This is useful if an entry in the master standards catalogue was recently updated and the user wants to see the updated content.
Launch application
The Launch application dropdown box shows only the specific versions of the applications that are available for the Standard.
To launch your design application, select the application from the Launch application dropdown box and then select the button. This is used after using the Set standard button. There are no extra command switches used by Harmony’s application launcher, it just launches the application allowing the most current configurations to be active. Applications can be launched outside of Harmony, however note any command switches (such as Autodesk user profile switches) in the shortcut will take precedence.
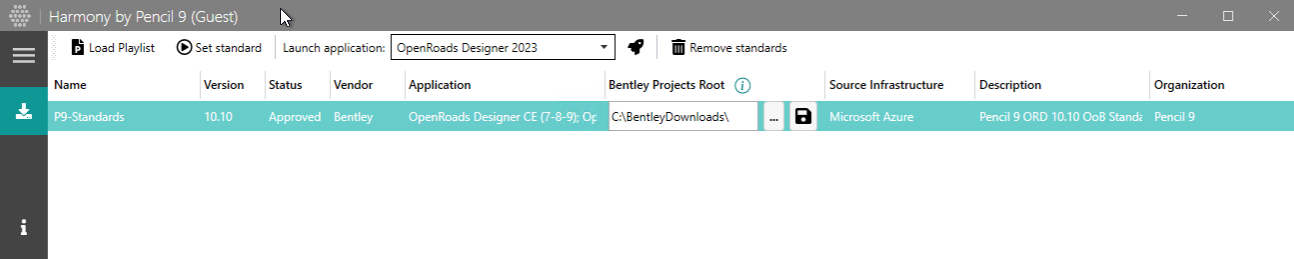
Downloaded screen
The Downloaded screen displays all the standards that have already been cached or set previously.
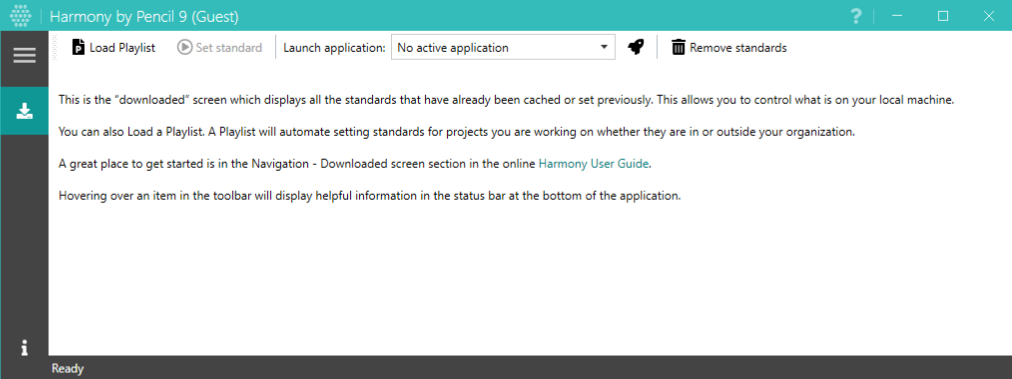
Load Playlist
Use this button to load a Playlist file (Harmony-playlist.xml). Navigate to the location where the file is located and click Open. This will read the Playlist file and set the standard. The loaded standard will be shown in the Downloaded list.
Set standard
To set a Standard, ensure that the standard to be set is highlighted and select the Set standard button. If you already have the standard, Set standard will make an already downloaded standard become the current standard and will also ensure the most up to date content is retrieved.
Harmony will retrieve the content and set the standard which could include automatically configuring the appropriate design application to use the content that has been retrieved.
Log-in credentials may be required to authorize the user if the standards are in a location where authentication is required.
Launch application
The Launch application dropdown box shows only the specific versions of the applications that are available for the Standard.
To launch your design application, select the application from the Launch application dropdown box and then select the button. This is used after using the Set standard button. There are no extra command switches used by Harmony’s application launcher, it just launches the application allowing the most current configurations to be active. Applications can be launched outside of Harmony, however note any command switches (such as Autodesk user profile switches) in the shortcut will take precedence.
Remove standard
To remove a Standard from the machine, ensure that the standard to be removed is highlighted and select the Remove standard button. Harmony will delete the content and remove any configurations that were applied.
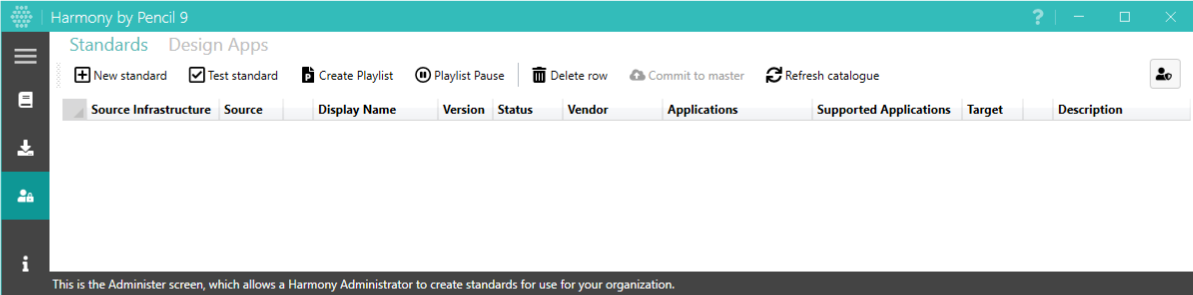
Admin screen
The Admin screen enables an administrator to configure standards, test and set them to be visible to other Harmony users. There are two tabs along the top; Standards and Design Apps. The Standards tab is used to manage the standards and the Design Apps tab is for generating an Instruction file to configure design applications.
Logging in
Access to the Admin screen requires a username and password. Pencil 9 will generate an account for admins that require access. Once an account is created, the user will receive an email from support@pencil9.com which will detail the username and password.
Note: For users who are in trial mode, the following credentials can be used:
User name: harmonyadmin
Password: Harmony1234
Selecting the Admin screen button brings up a dialogue box which will request the user to enter their credentials. The first time a user logs into the Admin screen, a prompt will request the temporary password be reset. See the section on Password requirements for what components are required in a password.
Once the password has been reset, the application will log the user in.
A user can also reset their password at anytime from the Standards tab. See User Account for more information.
Forgot password
For users that have forgotten their password, input your username (this will be your email address) and select the “forgot password” button on the log-in screen. An email with a verification code will be sent to the user. Once the verification code has been successfully entered, the user will be able to reset their password.
Password requirements
The following are the criteria for new passwords:
- Must be greater than 8 characters in length
- Must contain a number
- Must contain a lowercase letter
- Must contain a uppercase letter
- Must contain a special character
Standards tab

New Standard
To add a new line in the master standards catalogue, select the New standard button. This will generate a new line in the table. Within the new line, add the following details to correctly generate an entry.
| Heading | Entry |
|---|---|
| Source Infrastructure |
Network - Enables selection of network folder for Source ProjectWise - Enables selection of ProjectWise folder for Source BIM360 - Enables selection of Autodesk Construction Cloud or Autodesk BIM360 location for Source Amazon Web Services - Enables selection of Amazon Web Services S3 Bucket for Source Microsoft Azure - Enables selection of Microsoft Azure Container for Source Google Cloud - Enables selection of Google Cloud Platform Bucket for Source |
| Source Network, ProjectWise or BIM360 |
Network, ProjectWise, BIM360 - Set source folder by pasting the path into the line or selecting the three dots and navigating to the folder. Windows environment variables can be used here. See Working from a Network, Working from ProjectWise or Working from ACC for more information on working from this platform. |
| Source Amazon Web Services |
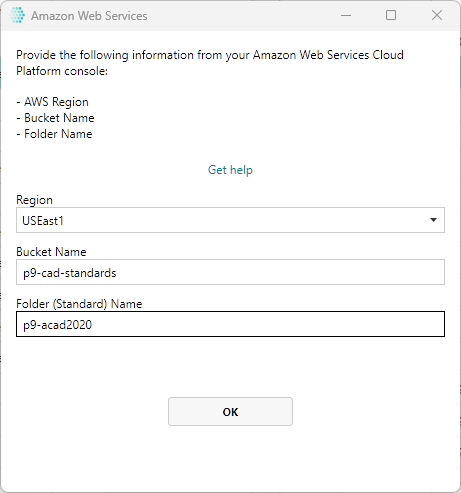
Select the three dots and then fill in as below: AWS region - Use the drop down to select the AWS Region of the bucket. e.g. USEast1. Bucket Name - This is the name of the bucket. e.g. p9-cad-standards . Folder (Standard) Name - This is the name of the folder in the bucket that contains the Standard. e.g. p9-acad2020 . See Storing content in Amazon Web Services for more information on configuring this Source platform. |
| Source Microsoft Azure |
Select the three dots and then fill in as below: Azure Connection string - Paste the entire connection string from the account access keys page. Container (Standard) Name - This is the name of the Container, within which the Standard is stored e.g. p9-acad2020 . See Storing content in Microsoft Azure for more information on configuring this Source platform. |
| Source Google Cloud |
Select the three dots and then fill in as below: GCP Bucket Name - This is the name of the GCP Bucket exactly as it appears in the Google Cloud Platform e.g. p9-cad-standards. Folder (Standard) Name - This is the name of the first level folder within the GCP Bucket, within which the Standard is stored e.g. p9-acad2020. See Storing content in Google Cloud Platform for more information on configuring this Source platform. |
| Display Name | Optional: User defined name for the Standard. When a value is not specified, the folder where the standard is located is the default value. |
| Version | Optional: User generated version number |
| Status | WIP - Only visible on this screen Checking - Only visible on this screen Approved - Visible to all users on the Available screen |
| Vendor | Optional: User defined "Vendor" label |
| Application | Select the application(s) thats will be used by this Standard. Each application that is clicked is appended into the next column. This controls the Applications list on the Available and Downloaded screens for each Standard. |
| Supported Applications | A list of the applications that are compatible with this Standard. The items here are generated from the previous column. Click here to modify any of the Supported Application list items. Items in this list show up on the Application Launcher dropdown on the Available and Downloaded screens. |
| Target | Set target destination on local machine. |
| Description | Optional: User defined description of the standard |
Note: The Commit to Master button must be pressed to commit the changes to the master standards catalogue. If the changes are not committed prior to leaving the Admin screen, all changes will be lost.
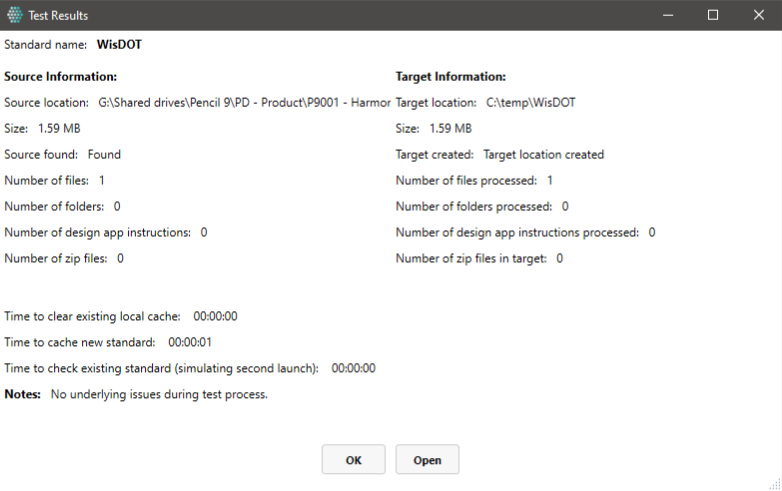
Test Standard
This enables an admin to test a standard during the process of creating a new standard, prior to approving the standard for use by advancing it to the Approved state.
To use this function, select the standard to be tested and then click the Test Standard button.
Harmony will locate the source content and process this. An information screen will then show the status of the standard and some statistics such as the number of files and zipped files, whether an Instruction file was found and any settings that were applied.
This information can be useful in confirming that all the settings have been applied.
The Open button on the Test dialogue will open the target location which is useful when developing the Instruction file.
Note: The Test Standard button works for testing the application configuration for all Source platforms except Bentley ProjectWise. For testing the application configurations from Bentley ProjectWise, a Playlist needs to be created and a file opened from Bentley ProjectWise. See for more information.
Playlist
A Playlist file is used to automate the delivery of Standards from ProjectWise. Select the Standard (or CTRL + Click for multiple Standards) to be used for the project in ProjectWise and then select the Playlist button. This generates a Playlist file and Harmony will open the location where the file is created.
New in 1.5 The Playlist file can be placed in a Network location, Autodesk Construction Cloud or ProjectWise.
Notes:
- The Playlist file must not be renamed.
- The Playlist file can be placed in any folder within a project. When a file is opened using Harmony Open or launched from ProjectWise, Harmony will first look in the current folder and parent folders for a Playlist. Once Harmony locates a Playlist it will process the Playlist. This allows flexibility and greater control of automation on your project. Playlists can be strategically placed to only automate specific folders within a project structure.
- If a Harmony Admin needs to see which standard was referenced into the Playlist, the user can open the Playlist with a text editor such as Notepad. The name of the standard is given within the Resource_display_title tags as shown below:
<Resource_display_title> </Resource_display_title> - When working in ProjectWise, it is recommended that the Description is updated with the Standard name, to facilitate easy future reference.
Playlist Pause
A Playlist Pause file can be used to instruct Harmony to not automate certain folders. Similar to creating a Playlist file, select the Playlist Pause button (it doesn’t matter which standard is currently selected) and Harmony will generate a Playlist Pause file and open the location where the file is located. The Playlist Pause file can then be placed in ProjectWise.
Notes:
- The Playlist file must not be renamed.
- The Playlist Pause file can be placed in any folder within a Bentley ProjectWise project. As Harmony is searching up the folder tree looking for Playlists, if the first Playlist it finds is a Playlist Pause file, Harmony will stop looking for Playlists and no automation will occur.
Remove Standard
This removes an entry from the master standards catalogue. Ensure that the line to be removed is selected prior to clicking the Remove standard button. A dialogue to confirm the deletion will appear.
Note: This does not delete any files. This only removes the entry from the master standards catalogue.
Commit to Master
This synchronizes all changes to the master standards catalogue. Any changes made on a single row on the table needs to be confirmed by clicking the Commit to master button.
Note: Selecting any other element within the Harmony interface whilst editing a row will bring up a dialogue box requesting the user to confirm or discard the changes being made to the standard being edited.
Refresh catalogue
Selecting this button will refresh the available standards. This is useful if an entry in the master standards catalogue was recently updated and the user wants to see the updated content.
User account
This button allows the logged in user to reset their password or log out of the admin screen.
Reset password: After clicking this button, an email with a verification code will be sent to the user. Once the verification code has been successfully entered, the user will be able to reset their password.
Log out: Clicking this button logs the user out of the admin screen. The user must log back into Harmony to access the Admin screen.
Note: The user does not have to log out of the Admin screen prior to closing the application. Closing the application will log the user out automatically.
Design Apps tab
Design/Engineering Application
This starts the process to generate an Instruction file which is used to automate the configuration of a design application.
Select the application for which an Instruction file is to be created from the dropdown. This loads the relevant set of options for the application.
Autodesk® AutoCAD® Instruction file
Selecting Autodesk AutoCAD from the Design/Engineering Application dropdown brings the following items that can be set:
| Item | Description | Example value |
|---|---|---|
| Profile name* | Name of the profile to be created. | Harmony_ACAD |
| Version* | Dropdown for specific version of the application. A separate instruction file is required for every version to be configured. | 2021 |
* Denotes mandatory fields
| Item | Description | Example value |
|---|---|---|
| Support path folders | Folder location(s) to be set for support. The support paths built into the application do not have to be included here, only extra ones. See note 1, 2 |
C:\Harmony\CAD\Support\; C:\Harmony\CAD\templates\ |
| Trusted Root | Root folder location to be trusted for a standard. This should be the location a standard is being cached to. All subfolders will also be trusted locations. Only a single folder can be defined here. |
C:\Harmony\ |
| Main CUI file | If profile has a custom CUI or CUIX. Full path including the file should be inserted here. See note 2 |
C:\Harmony\CAD\menu\Custom_menu.CUI; |
| Enterprise CUI file | If profile has a custom CUI or CUIX. Full path including the file should be inserted here. This is often used for client delivered CUI files. If this is blank no enterprise CUI will be used because there is no application default. |
C:\Harmony\CAD\menu\Client_menu.CUI; |
| Print spooler location | Sets the folder used by the Print Spooler where temporary plot files are stored. Only a single folder can be defined here. |
C:\Harmony\CAD\Plot\Temp |
| Printer configration paths | Sets the folders where the printer configurations are located. See note 1, 2 |
C:\Harmony\CAD\Plot\ |
| Printer description paths | Sets the folders where the printer descriptions are located. See note 1, 2 |
C:\Harmony\CAD\Plot\ |
| Plot style location | Sets the folders where the plot configuration files are located (CTB or STB). See note 1, 2 |
C:\Harmony\CAD\Plot\ |
| Auto save location | Sets the auto save location. Only a single folder can be defined here. |
C:\Harmony\CAD\Temp\ |
| Templates location | Sets the folder where drawing templates are located. Only a single folder can be defined here. |
C:\Harmony\CAD\Templates\ |
| Sheet Set Templates location | Sets the folder where Sheet Set drawing templates are located. Only a single folder can be defined here. |
C:\Harmony\CAD\Templates\ |
| Default file for QNEW | Sets the default template drawing used for (QNEW). Only a single file can be defined here. |
C:\Harmony\CAD\Templates\imperial.dwt |
| Default file for Sheet creation | Sets the default template drawing used for sheet creation and page setup overrides. Only a single file can be defined here. |
C:\Harmony\CAD\Templates\imperial.dwt |
| Tool palette paths | Set the folders where the Tool palettes are located. The default folders built into the application do not have to be included here, only extra ones. See note 1 |
C:\Harmony\CAD\Palettes\ |
| Log file location | Sets the folder where log files are stored. Only a single folder can be defined here. |
C:\Harmony\CAD\Logs\ |
| Temporary file location | Sets the folder location for temporary drawing files. Only a single folder can be defined here. |
C:\Harmony\CAD\Temp\ |
| Temporary XREF location | Sets the folder location for temporary XREF files. Only a single folder can be defined here. |
C:\Harmony\CAD\Temp\ |
* Denotes mandatory fields
Note 1: Multiple folders need to be separated by a semi-colon.
Note 2: Any blanks will use the application default.
| Item | Description | Example value |
|---|---|---|
| Additional Content | Any additional settings can be taken from an Autodesk ARG file and pasted here. Ensure that the syntax and format match the ARG file. Multiple sections are supported. |
[HKEY_CURRENT_USER\Software\Autodesk\AutoCAD\R23.0\ACAD-2000:409\Profiles\<<C3D_Imperial>>\General] "PrinterConfigDir"="C:\\Harmony\\CAD\\plotters" |
Autodesk® Civil 3D® Instruction file
Selecting Autodesk Civil 3D from the Design/Engineering Application dropdown brings the following items that can be set:
| Item | Description | Example value |
|---|---|---|
| Profile name* | Name of the profile to be created. | Harmony_C3D |
| Version* | Dropdown for specific version of the application. A separate instruction file is required for every version to be configured. Select whether the profile will have Imperial or Metric units. | 2021 |
* Denotes mandatory fields
| Item | Description | Example value |
|---|---|---|
| Support path folders | Folder location(s) to be set for support. The support paths built into the application do not have to be included here, only extra ones. See note 1, 2 |
C:\Harmony\CAD\Support\; C:\Harmony\CAD\templates\ |
| Trusted Root | Root folder location to be trusted for a standard. This should be the location a standard is being cached to. All subfolders will also be trusted locations. Only a single folder can be defined here. |
C:\Harmony\ |
| Main CUI file | If profile has a custom CUI or CUIX. Full path including the file should be inserted here. See note 2 |
C:\Harmony\CAD\menu\Custom_menu.CUI; |
| Enterprise CUI file | If profile has a custom CUI or CUIX. Full path including the file should be inserted here. This is often used for client delivered CUI files. If this is blank no enterprise CUI will be used because there is no application default. |
C:\Harmony\CAD\menu\Client_menu.CUI; |
| Print spooler location | Sets the folder used by the Print Spooler where temporary plot files are stored. Only a single folder can be defined here. |
C:\Harmony\CAD\Plot\Temp |
| Printer configration paths | Sets the folders where the printer configurations are located. See note 1, 2 |
C:\Harmony\CAD\Plot\ |
| Printer description paths | Sets the folders where the printer descriptions are located. See note 1, 2 |
C:\Harmony\CAD\Plot\ |
| Plot style location | Sets the folders where the plot configuration files are located (CTB or STB). See note 1, 2 |
C:\Harmony\CAD\Plot\ |
| Auto save location | Sets the auto save location. Only a single folder can be defined here. |
C:\Harmony\CAD\Temp\ |
| Templates location | Sets the folder where drawing templates are located. Only a single folder can be defined here. |
C:\Harmony\CAD\Templates\ |
| Sheet Set Templates location | Sets the folder where Sheet Set drawing templates are located. Only a single folder can be defined here. |
C:\Harmony\CAD\Templates\ |
| Default file for QNEW | Sets the default template drawing used for (QNEW). Only a single file can be defined here. |
C:\Harmony\CAD\Templates\imperial.dwt |
| Default file for Sheet creation | Sets the default template drawing used for sheet creation and page setup overrides. Only a single file can be defined here. |
C:\Harmony\CAD\Templates\imperial.dwt |
| Tool palette paths | Set the folders where the Tool palettes are located. The default folders built into the application do not have to be included here, only extra ones. See note 1 |
C:\Harmony\CAD\Palettes\ |
| Log file location | Sets the folder where log files are stored. Only a single folder can be defined here. |
C:\Harmony\CAD\Logs\ |
| Temporary file location | Sets the folder location for temporary drawing files. Only a single folder can be defined here. |
C:\Harmony\CAD\Temp\ |
| Temporary XREF location | Sets the folder location for temporary XREF files. Only a single folder can be defined here. |
C:\Harmony\CAD\Temp\ |
* Denotes mandatory fields
Note 1: Multiple folders need to be separated by a semi-colon.
Note 2: Any blanks will use the application default.
| Item | Description | Example value |
|---|---|---|
| Pressure Network catalog folder | Civil 3D only. Sets the default Pressure Network Catalog folder. This should be where the .sqlite file resides See note 1 |
C:\Harmony\CAD\Pressure Pipes Catalog\Imperial\ |
| Pipe Network catalog folder | Civil 3D only. Sets the default Pipe Network Pipe Catalog folder. The selected folder should contain subfolders with .apc files. See note 1 |
C:\Harmony\CAD\Pipes Catalog\US Imperial Pipes\Us Imperial Pipes.apc |
| Pipe Network Shared Content path | Civil 3D only. Sets the folder for the Pipe Network Shared Content Path. See note 1 |
C:\Harmony\CAD\Pipes Catalog\Aecc Shared Content\ |
Note 1: Any blanks will use the application default.
| Item | Description | Example value |
|---|---|---|
| Additional Content | Any additional settings can be taken from an Autodesk ARG file and pasted here. Ensure that the syntax and format match the ARG file. Multiple sections are supported. |
[HKEY_CURRENT_USER\Software\Autodesk\AutoCAD\R23.0\ACAD-2000:409\Profiles\<<C3D_Imperial>>\General] "PrinterConfigDir"="C:\\Harmony\\CAD\\plotters" |
Bentley Instruction file
Selecting a Bentley CONNECT Edition based application from the Design/Engineering Application dropdown brings the following items that can be set:
| Item | Description | Example value |
|---|---|---|
| Harmony Title* | Title of the Instructions file | MicrostationCE_U14_Imperial |
| Application tick boxes | Select the applications that are to be configured with this instructions file. | Microstation |
* Denotes mandatory fields
| Item | Description | Example value |
|---|---|---|
| Configuration folder* | _USTN_CONFIGURATION The path to the WorkspaceSetup.CFG file |
C:\Harmony\ORD_Americas\ |
| WorkSpace name* | _USTN_WORKSPACENAME This is the name of the WorkSpace to be loaded for the project |
_CT_Civil Standards - Imperial |
* Denotes mandatory fields
Note 1: Any Bentley variables can be placed in the fields.
Note 2: All these variables can be locked so they are not overwritten by proceeding configuration settings.
| Item | Description | Example value |
|---|---|---|
| Harmony ProjectWise CFG | Set the location and name to where a configuration for these Instructions will be written | C:\BentleyCommon\CommonConfiguration.cfg |
| Worksets Root (PW) | _USTN_WORKSETSROOT Sets the root location of the Workset. This is location of the Workset CFG file |
F:\Projects\ |
| Workset Name (PW) | _USTN_WORKSETNAME Sets the name of the Workset. |
Project001 |
| Workset Root (PW) | _USTN_WORKSETROOT Sets the path to the project root folder. |
$(_USTN_WORKSETSROOT)$(_USTN_WORKSETNAME)/ |
| Workset Standards Folder (PW) | _USTN_WORKSETSTANDARDS Set the path to the standards folder for a project |
$(_USTN_WORKSETROOT)Standards/ |
* Denotes mandatory fields
Note 1: Any bentley variables can be placed in the fields.
Note 2: All these variables can be locked so they are not overwritten by proceeding configuration settings.
Note 3: The dropdown fields contain variables that can be used as a starting point for defining the path within ProjectWise which are defined as follows:
- $(dev(_DGNDIR)) - This dynamically defines the path of the Datasource in ProjectWise that a file was opened from.
- $(dms_project(_DGNDIR)) - This dynamically defines the path of a rich project in ProjectWise that a file was opened from.
- $(dms_parentproject (_DGNDIR)) - This dynamically defines the path of a parent rich project in ProjectWise that a file was opened from. This is useful when a rich project is nested inside another rich project.
| Item | Description | Example value |
|---|---|---|
| Worksets Root | _USTN_WORKSETSROOT Sets the root location of the Workset. This is location of the Workset CFG file |
F:\Projects\ |
Note 1: Any bentley variables can be placed in the fields.
Note 2: All these variables can be locked so they are not overwritten by proceeding configuration settings.
Note 3: The Harmony_network.cfg must be included (i.e. %include) in your Workspace cfg file(s). Do this by adding the code snippet below to your Workspace.cfg files(s). This will no disrupt settings defined for teams working within ProjectWise. Additionally, this code snippet will support external organizations using this standard on their own network.
%include C:\temp\p9\Harmony\Harmony_Network.cfg
%endif
| Item | Description | Example value |
|---|---|---|
| Organization folder | _USTN_ORGANIZATION The path to the Organization folder |
$(_USTN_CONFIGURATION)Organization/ |
| Civil Organization Root | _USTN_CIVILORGANIZATIONROOT The path to the Organization-Civil folder. This is used for the civil applications only. |
$(_USTN_CONFIGURATION)Organization-Civil/ |
| WorkSpaces Root Folder | _USTN_WORKSPACESROOT The path to the WorkSpaces folder. This is the directory where the Workspace CFG files are located. |
$(_USTN_CONFIGURATION)WorkSpaces/ |
| WorkSpace Root Folder | _USTN_WORKSPACEROOT The path to the WorkSpace folder. This is the directory where the WorkSpace files are located. |
$(_USTN_WORKSPACESROOT)$(_USTN_WORKSPACENAME)/ |
| WorkSpace Standards folder | _USTN_WORKSPACESTANDARDS The path to the Standards folder within a WorkSpace. |
$(_USTN_WORKSPACEROOT)Standards/ |
| Workspaces List | _USTN_WORKSPACESLIST This variable must be set when using ProjectWise. Harmony will set this automatically for you as follows: $(_USTN_WORKSPACESROOT)$(_USTN_WORKSPACENAME). |
$(_USTN_WORKSPACESROOT)$(_USTN_WORKSPACENAME)/ |
| Worksets List | _USTN_WORKSETSLIST The fullpath to a Workset cfg file. |
$(_USTN_WORKSETSROOT)$(_USTN_WORKSETNAME)/ |
| Workset DGNS | _USTN_WORKSETDGNS The default path to the folder where DGN files are stored. |
$(_USTN_WORKSETROOT)Dgn/ |
| Workset out | _USTN_WORKSETOUT The default path to the folder where output files created by Bentley applications are exported. |
$(_USTN_WORKSETROOT)out/ |
| Workset DGNWS Root | _USTN_WORKSETDGNWSROOT The folder where DGNWS file is stored. |
$(_USTN_WORKSETSROOT) |
| Workset DGNWS | _USTN_WORKSETDGNWS This is the full path to where the DGNWS file is to be created. The name of the DGNWS files must be specified as well. |
$(_USTN_WORKSETSDGNWSROOT)$(_USTN_WORKSETNAME).dgnws |
Note: Any bentley variables can be placed in the fields.
Note 2: All these variables can be locked so they are not overwritten by proceeding configuration settings.
| Item | Description | Example value |
|---|---|---|
| Additional Content | Any other variables can be placed here and set in the same manner as within a CFG file. | CIVIL_ORGANIZATION_ROOT = $(_USTN_CONFIGURATION)Organization-Civil |
Note: Any bentley variables can be placed in the fields.
Create instruction
Click the Create instruction button to export the settings to a Harmony instruction file. Harmony will open the location of the exported instruction file. This file can then be placed in the same folder as the standard to be automated (the master standards root folder).
Load instructions
Click the Load instruction button to import a previously saved set of settings from a Harmony instruction file. Use the interface to modify any settings prior to clicking Create instruction to re-export the content.
Key Concepts
This section outlines the fundamental ways in which Harmony operates and then suggests some strategies that the admin could employ in order to maximize the benefit that Harmony can bring.
There are a few methods that are available for admins to use for the configuration of their applications.
- Synchronization of content from one location to another.
- Configuration of design applications.
- Plug-ins for Document Management Systems
Harmony will always synchronize content prior to setting any configurations.
In developing a strategy for your organization, it is worth knowing that Harmony can use either of the items 1 and 2 listed above or both together. Item 3 is used to automate the configuration from a Document Management System offering a “no-touch” experience for the end user.
Synchronization of content
Once a source and destination are set, Harmony will create a copy of the source content in the target location after the Set Standard or Test button has been clicked.
If a source folder contains zip files, Harmony will also extract the contents of those zip files.
Once a synchronization is complete, any subsequent click of the Set standard button will start a check process to ensure that only the content from the source is at the target. Modifications to the target location are removed and replaced with that from the source ensuring that only the content from the source is at the target location.
- See for more information.
Windows environment variables
Windows environment variables can be used when considering the Source location. This allows for Source content to be placed in locations which may change from to user to user. This is useful when storing Standards in Autodesk Construction Cloud which is stored in the user profile location. The following table outlines some of the environment variables that can be used.
| Environment variable | Example path |
|---|---|
| %SystemDrive% | C:\ |
| %ProgramData% | C:\ProgramData\ |
| %ProgramFiles% | C:\Program Files\ |
| %ProgramFiles(x86)% | C:\Program Files (x86)\ |
| %UserProfile% | C:\Users\UserName\ |
| %LocalAppdata% | C:\Users\UserName\AppData\Local\ |
| %Temp% | C:\Users\UserName\AppData\Local\Temp\ |
| %AppData% | C:\Users\UserName\AppData\Roaming\ |
| %SystemRoot% | C:\Windows\ |
Configuration of design applications
To configure a design application, an Instruction file is required and placed within the root folder of the source location. This file is read by Harmony and the configuration applied.
The Instruction file is generated by Harmony from the Design Apps tab of the Admin screen. This is where the configuration of the application is set.
- See for more information.
- See for more information.
- See for more information.
Plug-ins for Document Management Systems
Plug-ins for Document Management Systems such as Bentley ProjectWise are also setup during the install, if the application was detected on the machine at that time.
The plug-ins do not require any input from an end-user or configuration from an administrator as they are fully automated. For Bentley ProjectWise, the only item required to automate a project is to have a valid Playlist file in a folder within a ProjectWise Work Area.
When a file from the Document Management System is then set to open, the Playlist automates the process of ensuring the most current up to date standards are synchronized and the design application configured properly.
This occurs before the file is opened and thus allows an application to be configured prior to launch.
The Playlist file is generated by Harmony from the Standards tab of the Admin screen.
- See for more information.
Working from a Network
When working across a Network infrastructure (including but not limited to Shared Drives, Mapped drives, Network locations and cloud sync solutions such as One Drive), it is important to note that it is a two step workflow to open a file.
- Harmony is launched and the user sets the Standard.
- The user launches the application from Harmony and then opens the file to be worked on.
This first step, launching and setting the standard first, ensures that the latest content is cached and the design application is configured for use.
An application launcher is provided on the Available and Downloaded standards screens. This is an efficient way to launch the appropriate application. There are no extra command switches used by Harmony’s application launcher, it just launches the application allowing the most current configurations to be active. Applications can be launched outside of Harmony, however note any command switches (such as Autodesk user profile switches) in the shortcut will take precedence.
When setting a source or target for a networked location, ensure the full path is given where possible rather than mapped drives. This is to ensure that users who don’t have the same mapped drive are still able to access the content. Where all users have the same mapped drive, the drive letter can be used.
Working from Autodesk Construction Cloud
When working from Autodesk Construction Cloud, it is important to note that it is a two step workflow to open a file.
- Harmony is launched and the user sets the Standard.
- The user launches the application from Harmony and then opens the file to be worked on.
This first step, launching and setting the standard first, ensures that the latest content is cached and the design application is configured for use.
An application launcher is provided on the Available and Downloaded standards screens. This is an efficient way to launch the appropriate application. There are no extra command switches used by Harmony’s application launcher, it just launches the application allowing the most current configurations to be active. Applications can be launched outside of Harmony, however note any command switches (such as Autodesk user profile switches) in the shortcut will take precedence.
Working from ProjectWise
Please ensure that ProjectWise is installed prior to installing Harmony. This will ensure that the Harmony plug-in for ProjectWise is installed. If installing projectwise after Harmony has been installed, simply run the Harmony install again and Harmony will install the ProjectWise plug-in.
When working with Harmony and ProjectWise, a Playlist file that needs to be placed into ProjectWise which provides a fully automated solution for delivering and setting a Standard. This Playlist can be placed in any folder within a ProjectWise Work Area. Once an admin creates and adds a Playlist to the project, Harmony will search up the project tree looking for a Playlist when a file is launched. If a Playlist is found, it is processed and Harmony stops looking for additional Playlists. The standards and applications will be automated for the entire team, regardless of the team’s location.
- See for more information.
New in v1.5 Harmony Open with Autodesk
Before starting, ensure that the Harmony plug-in for Autodesk is installed prior to launching AutoCAD or Civil 3D. Note that this is a separate install from the base Harmony application.
The Harmony plug-in only works with Harmony 1.5 and greater.
A Playlist should also be placed in a folder where the AutoCAD or Civil 3D files reside or another parent folder.
If a Playlist Pause file is located
- See for more information.
Launch AutoCAD or Civil 3D and open a new file. Enter HARMONYOPEN to start the Harmony Open function or navigate to the Add in Ribbon tab. Click Harmony Open to launch the Harmony Open dialogue. From here, navigate to the AutoCAD or Civil 3D file to be opened. Click Open.
Harmony will search up the project tree looking for a Playlist. If a Playlist is found, Harmony will cache the standard, configure the Profile and set this current and then open the file in this new profile.
If a Playlist is not found, the user will be presented with a message stating "No Harmony playlist found, opening drawing in current profile and standards." and Harmony will open the file in the current profile. This will be just like opening any file normally.
Storing content in Amazon Web Services
Standards can be stored in an Amazon Web Services (AWS) S3 bucket and accessed by anyone through Harmony. The following sections outline the permissions and steps required to successfully setup AWS S3 buckets for storing Standards.
Roles and permissions
In order to create AWS Buckets, the user must have appropriate permissions. The following policy is recommended to be applied to the user for working with AWS Buckets:
- AWS managed policy: AmazonS3FullAccess. This policy grants permissions that allow full access to Amazon S3.
The simplist method to achieve this is to access the Identity and Access Management Console, create a new User Group (e.g. S3_Admins), add the users and apply the AmazonS3FullAccess policy. See the link below for details on this workflow:
Creating a bucket
Follow the steps on the page below create a bucket. The bucket can be encrypted and have version control enabled, if desired.
Please note that Harmony is currently only able to access the following AWS Regions:
| Location | Region |
|---|---|
| Africa (Cape Town) | AFSouth1 |
| Europe (Frankfurt) | EUCentral1 |
| Europe (Milan) | EUSouth1 |
| Europe (Ireland) | EUWest1 |
| Europe (London) | EUWest2 |
| Europe (Paris) | EUWest3 |
| US East (N. Virginia) | USEast1 |
| US East (Ohio) | USEast2 |
| US West (N. California) | USWest1 |
| US West (Oregon) | USWest2 |
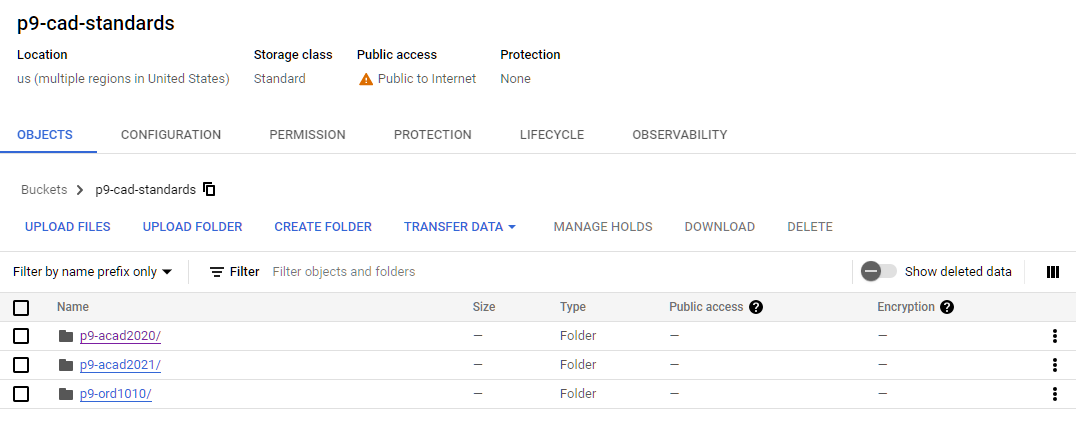
Each bucket can have folders and sub-folders, however Harmony can access only the first level folder within a Bucket. For this reason, it is required to create a first level folder for each Standard and have no sub-folders. With this architecture a single AWS S3 bucket can house all Standards, each within their own folder.
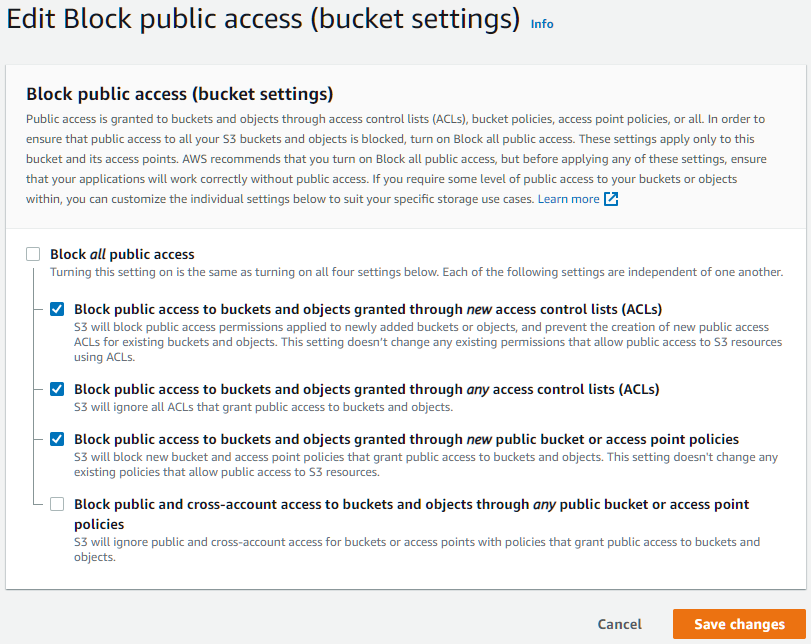
Making a bucket public
Whilst creating a bucket, within the "Block public access (bucket settings)" section, ensure there is no tick against "Block all public access" and "Block public and crosss-account access to buckets and objects through any public bucket or access point policies"
If the bucket has already been created, select the bucket and then select "Permissions". From here, click Edit within the "Block public access (bucket settings)" and ensure there is no tick against "Block all public access" and "Block public and crosss-account access to buckets and objects through any public bucket or access point policies".
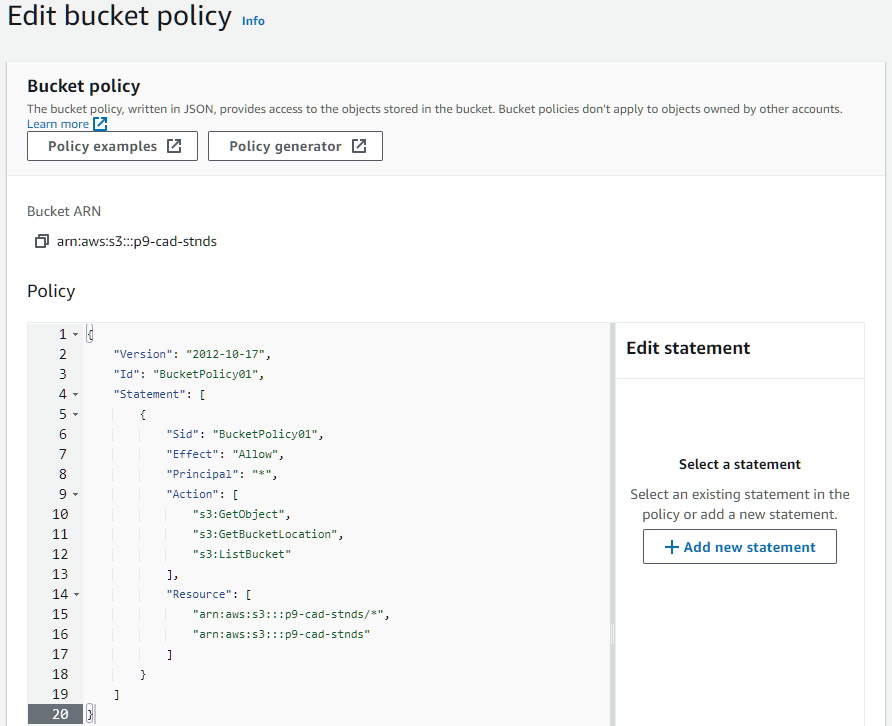
A policy also needs to be added to the bucket for access. Click the bucket that was created and then select the "Permissions" tab. Scroll down to the "Bucket Policy" section. Copy and insert the following text into the Bucket Policy section. Replace the lines highlghted in yellow with your Bucket ARN, which is shown at the top of the "Edit bucket policy" section.
{
	"Version": "2012-10-17",
	"Id": "BucketPolicy01",
	"Statement": [
		{
			"Sid": "BucketPolicy01",
			"Effect": "Allow",
			"Principal": "*",
			"Action": [
				"s3:GetObject",
				"s3:GetBucketLocation",
				"s3:ListBucket"
			],
			"Resource": [
				"arn:aws:s3:::p9-cad-stnds/*",
				"arn:aws:s3:::p9-cad-stnds"
			]
		}
	]
}
This will show access to the bucket as "Public".
Adding an AWS bucket as a Source in Harmony
Once an AWS bucket and folder for the Standard have been created. A zipped copy of the Standard should be placed in the folder alongside an Instructions file, if required. The following information is required by Harmony when creating a new line in the master catalogue:
| Item | Value required |
|---|---|
| AWS Region | This is the name of the AWS Region where the bucket was created. Use the drop down to select the same region. e.g. USEast1 |
| Bucket Name | This is the name of the Bucket. e.g. p9-cad-standards |
| Folder (Standard) Name | This is the name of the folder in the bucket that contains the Standard. e.g. p9-acad2020 |
Storing content in Microsoft Azure
Standards can be stored in a Microsoft Azure Container and accessed by anyone through Harmony. The following sections outline the permissions and steps required to successfully setup Microsoft Azure Containers for storing Standards.
Roles and permissions
In order to create Azure Containers, the user must have appropriate permissions. The following roles are the minimum recommended for working with Azure Containers:
- Storage Account Contributor - Lets you manage Storage accounts, including accessing storage account keys which provide full access to storage account data.
- Storage Blob Data Owner - Allows for full access to Azure Storage blob containers and data
Further details on the available roles and permissions can be found on the Microsoft Learn site here:
Creating a Storage account and Container
A Storage account is required within which Containers can be created to store Standards. Follow the steps on the pages below create a Storage account and Container and learn how to upload a "blob":
Storage account creation notes
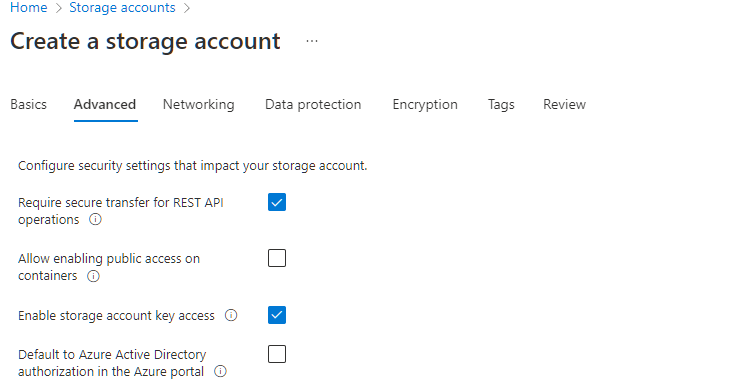
Whilst creating a Storage account, the following are Pencil 9 recommendations for selected sections/tabs. All other items can be configured as required by your organization:
| Tab: Section | Field | Recommendation |
|---|---|---|
| Advanced: Security | Allow enabling public access on containers | Disable to reduce risk from public exposure. |
| Advanced: Security | Enable storage account key access | Enabled. Must be enabled as access will be via Access key |
Container creation notes
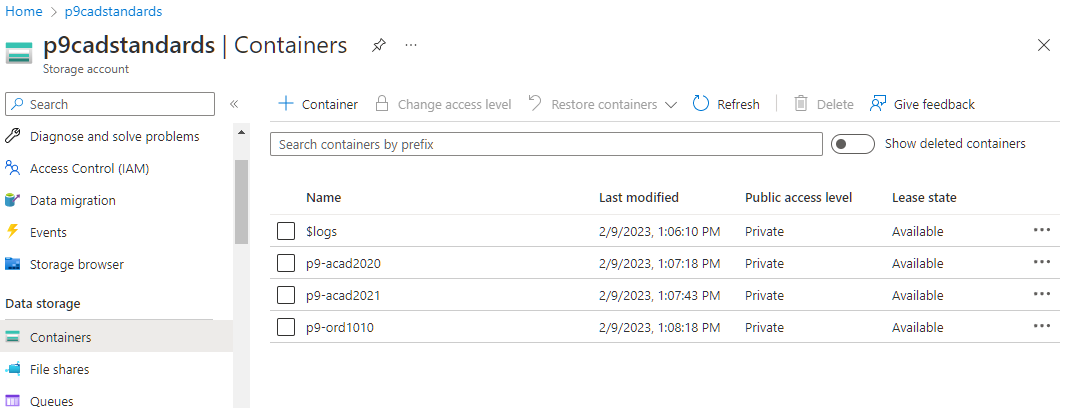
Consideration should be given to the name of the Container. This will be the name of the folder created on the local machine.
Each Container can have virtual folders, however Harmony can access only the content in the root of the Container. For this reason, it is required to create a new Container for each Standard and have no folders. There will therefore be a Container for every Standard.
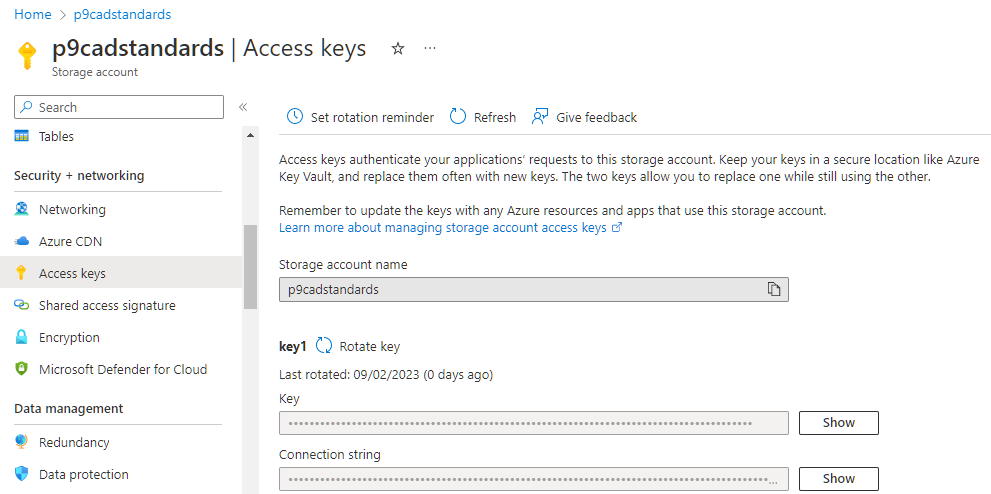
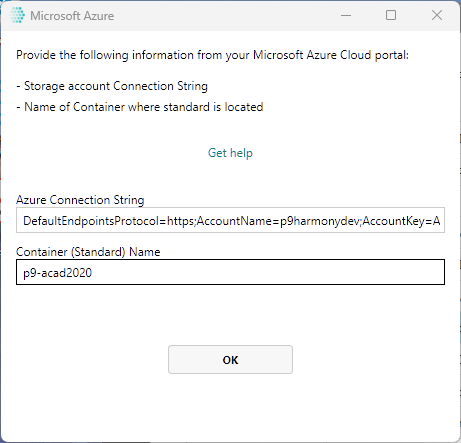
Connection string
The Connection string for an Access key will be required by Harmony to access the Container and any content. See the following page to see where this can be obtained. The entire Connection string should be copied and is used wihin Harmony (see next section).
Adding an Azure Container as a Source in Harmony
Once a Microsoft Azure container has been created. A zipped copy of the Standard should be placed within this alongside an Instructions file, if required. The following information is required by Harmony when creating a new line in the master catalogue:
| Item | Value required |
|---|---|
| Azure Connection string | Paste the entire connection string copied from the previous step |
| Container (Standard) Name | This is the name of the Container, within which the Standard is stored e.g. p9-acad2020 |
Storing content in Google Cloud Platform
Standards can be stored in a Google Cloud Patform (GCP) bucket. The following sections outline the permissions and steps required to successfully setup GCP for storing Standards.
Roles and permissions
In order to create GCP Buckets, the user must have appropriate permissions. The following role is recommended for working with GCP Buckets:
- Cloud Storage: Storage Admin - Grants full control of buckets and objects. When applied to an individual bucket, control applies only to the specified bucket and objects within the bucket.
Further details on the available roles and granting access to a role can be found on the GCP site here:
Creating a bucket
Follow the steps on the page below create a bucket. Harmony does support buckets that are encrypted and have Object Versioning enabled.
Each bucket can have folders and sub-folders, however Harmony can access only the first level folder within a Bucket. For this reason, it is required to create a first level folder for each Standard and have no sub-folders. With this architecture a single GCP Bucket can house all Standards, each within their own folder.
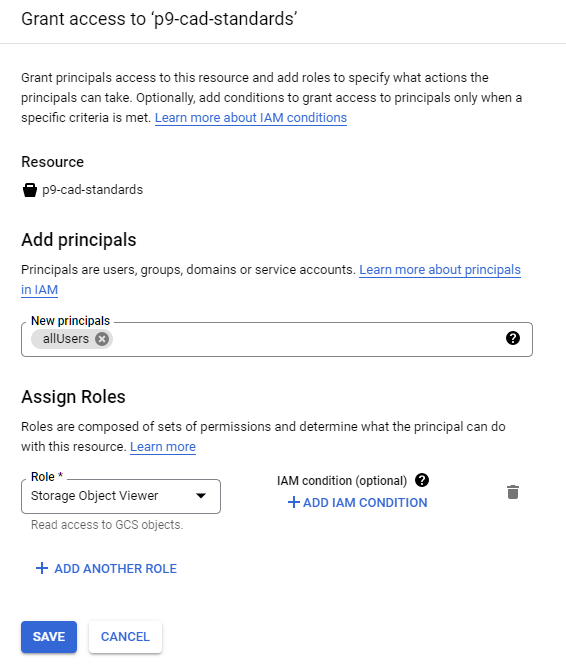
Making a bucket public
In order to ensure that all users are able to access the Standard, the allUsers group must be granted Viewer rights. Follow the steps on the GCP website at the link below. The page below outlines the steps to enable this at an individual object or Bucket level.
Adding a GCP folder as a Source in Harmony
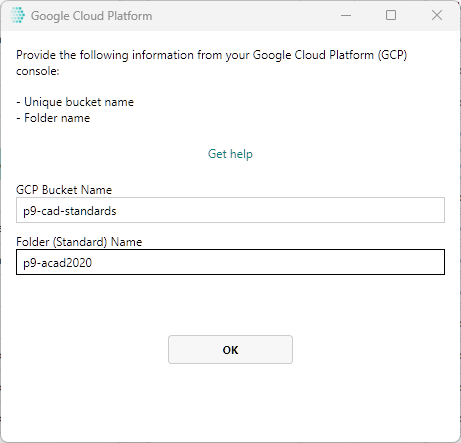
Once a GCP bucket and folder have been created. A zipped copy of the Standard should be placed in the folder alongside an Instructions file, if required. The following information is required by Harmony when creating a new line in the master catalogue:
| Item | Value required |
|---|---|
| GCP Bucket Name | This is the name of the GCP Bucket exactly as it appears in the Google Cloud Platform. e.g. p9-cad-standards |
| Folder (Standard) Name | This is the name of the first level folder within the GCP Bucket, within which the Standard is stored e.g. p9-acad2020 |
Autodesk configuration
Harmony can be used to configure an Autodesk application such as AutoCAD or Civil 3D by delivering resources as well as configuring a profile which is set to use that content. There are no additional requirements to manage content, cui files, lisp files, dll files, and more. The content should be reviewed and organized in the normal manner. Harmony will simply automate delivering this content to your project teams and ensure their applications are configured to use the right content for each project.
Autodesk configuration on a network
To configure an Autodesk standard for use on a network, take the following steps:
- Compress your standard and place this in the source location on your network.
- Within the Admin screen for Harmony, create an entry in the master standards catalogue. See for more information.
- Create an Autodesk instruction file and place this in the source location.
- See for more information.
- See for more information.
- Check the standard is configured correctly by launching the design application. To launch your design application, select the application from the Launch application dropdown box and then select the button. See for more information.
- Within the Admin screen for Harmony, change the status of the entry in the master standards catalogue to Approved to make this standard visible to all users.
The configuration work is complete after changing the status to Approved.
Autodesk configuration on Autodesk Construction Cloud
To configure an Autodesk standard for use within Autodesk Construction Cloud, take the following steps:
- Compress your standard and place this in a folder within your Autodesk Construction Cloud project.
- Within the Admin screen for Harmony, create an entry in the master standards catalogue. See for more information.
- Create an Autodesk instruction file and place this in the source location.
- See for more information.
- See for more information.
- Create a Playlist file and place this is the same location as defined in Step 1. See for more information.
- To set the standard, click Load Playlist in the Download screen. Navigate to the Playlist file created in the previous step and click Open. This will read the Playlist and set your standard.
- Check the standard is configured correctly by launching the design application. To launch your design application, select the application from the Launch application dropdown box and then select the button. See for more information.
- Within the Admin screen for Harmony, change the status of the entry in the master standards catalogue to Approved to make this standard visible to all users.
The configuration work is complete after changing the status to Approved.
Autodesk configuration in ProjectWise
To configure an Autodesk standard for use within ProjectWise, take the following steps:
- Compress your standard and place this in a folder within ProjectWise.
- Within the Admin screen for Harmony, create an entry in the master standards catalogue. See for more information.
- Create an Autodesk instruction file and place this in the source location.
- See for more information.
- See for more information.
- Create a Playlist file and place this in your project. See for more information. Place this in a folder within ProjectWise to automate that folder and its subfolders.
- Launch a design file from ProjectWise to confirm the configuration is working.
- Within the Admin screen for Harmony, change the status of the entry in the master standards catalogue to Approved to make this standard visible to all users.
Bentley configuration
This guide assumes the user is familiar with the Managed Workspace and the CONNECT Edition suite of Bentley Design applications. For this suite of Bentley design applications, there are a few critical variables that need to be set for base functionality.
Bentley configuration on a network
To configure a Standard for use with Bentley design applications, take the following steps:
- Compress your Standard and place this in the Source location.
- Create an entry in the master standards catalogue. See for more information.
- Create a Bentley instruction file and place this in the Source location. See for more information.
- For each workspace that will be using Harmony, add the following code to the Workspace cfg file:
%if !defined (_PWEXPLORER)
%include C:\temp\p9\Harmony\Harmony_Network.cfg
%endif - Launch your application using the Launch App dropdown. Only the workspace set in the Instruction file is available. Open a file to confirm the standard is being set.
- Change the status of the entry in the master standards catalogue to Approved.
Note: Harmony will modify the ConfigurationSetup.CFG file in C:\ProgramData\Bentley\[Application]\Configuration location with the following:
# This IF statement is used when launching this application from Harmony. Do not modify.
%if ($(HARMONY_NETWORK) == "1")
%include C:\temp\p9\Harmony_Network.cfg
%endif
Bentley configuration for external organizations on a network
External organizations can also use a Bentley workspace on their network (regardless of the Source location). For this workflow, the external organization must have access to the Playlist for the Standard to be loaded. Take the following steps:
- Launch Harmony
- Navigate to the Download screen and click Load a Playlist
- Load a Playlist
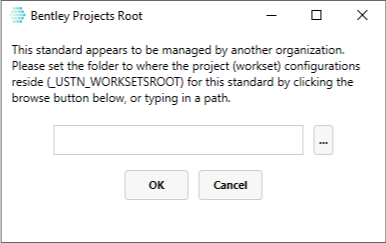
- Harmony will present a dialog box requesting the user set the Bentley Projects Root (_USTN_WORKSETSROOT). Use the three dots to navigate to a network path or paste in a path as required. Click OK when complete.
- Harmony will the proceed to load the standard as defined in the Playlist.
- Once the standard has been cached locally, click OK on the confirmation message box.
- Use the Launch App dropdown to open the desired Bentley application. Only the workspace set in the Instruction file is available. The Worksets available will only be those set by the user as part of this workflow.
- Open a file and work.
Notes:
- Harmony will retain the setting for the Bentley Projects Root for this standard.
- The path for Bentley Projects Root can be adjusted anytime by modifying the value of Bentley Projects Root column in the Downloads screen
Bentley configuration in ProjectWise
There are many ways to configure Bentley applications from ProjectWise with a Managed Workspace. This guide outlines one way in which Harmony can be used to automate the delivery of content and configuration of Bentley CONNECT edition design applications.
In order to utilize Harmony in ProjectWise the following steps are required:
- Compress your standard and place this in a folder within ProjectWise.
- Create an entry in the master standards catalogue. See for more information.
- Create a Bentley instruction file and place this in the source location. See for more information.
- Generate a Playlist and place this in a folder within ProjectWise to automate that folder and its subfolders. See for more information.
The next set of steps are to configure the application and then connect this to the managed workspace in ProjectWise.
- In your ProjectWise datasource, create a folder away from any projects and create a CFG file,
E.g. Standards\Managed WorkSpace\PW_Bentley_Common.CFG. - In the PW_Bentley_Common.CFG file, insert the path and name placed in the Bentley instruction file for Harmony ProjectWise CFG.
E.g. %include C:\temp\p9\Harmony_ProjectWise.cfg. - In ProjectWise Administrator, create a Configuration Settings Block (CSB) in the Predefined or Global level and create a %include statement to the PW_Bentley_Common.CFG file created in Step 5.
E.g. %include $(dev(_DGNDIR))Standards\Managed WorkSpace\PW_Bentley_Common.CFG
Save the CSB. - Assign the CSB to your project.
- Ensure the rest of the project is configured correctly. At a minimum, a CFG file is required for the location defined in the WorksetsRoot location.
- Within the Standards tab of the Harmony Admin screen, select the standard to be automated in ProjectWise and then click Playlist.
- Copy the playlist that was created by Harmony into a folder within the Project to automate that folder and its subfolders.
- The project is now ready for use. Select a DGN file and open with the appropriate application. Harmony will cache the content locally and create the CFG file with the configuration for the project. ProjectWise will read that CFG file and launch the application with the appropriate settings.
Bentley Standards organization
Organizations can place content in many different locations within the Bentley delivered folder structure, for example within Organization, Organization-Civil or the Workspace.
In managing content for your organization or that delivered by a client organization, it is easiest to leave the folder structure as delivered and make minor changes to incorporate this into your organization.
One method of organizing this is to locate all the Standards within a folder structure that allows easy upgrading and maintenance. One suggestion for a target folder structure is:
C:\Harmony\[OrganizationName]\[ApplicationName_ApplicationVersion]\Configuration
A typical path could therefore be:
C:\Harmony\Org1\OpenRoads Designer_10.08\Configuration
This can be placed in the Configuration Location field in Harmony and the appropriate standard should have this folder structure as well. This allows the segregation of organization and application including the version.
Accessibility
Below are current Windows Accessibility settings that are supported by Harmony:
- Color Filters
- Magnifier
- Narrator (partial)
For additional accessibility information regarding Harmony, review the Harmony Voluntary Product Accessibility Template (VPAT).
Autodesk, the Autodesk logo, AutoCAD and Civil 3D are registered trademarks or trademarks of Autodesk, Inc., and/or its subsidiaries and/or affiliates in the USA and/or other countries.